Comparing an immersion chiller to simple ice bath
For my first few brews I used an ice bath to cool the wort after the boil but had read so many glowing reports on the internet and in books about how much faster it is using a chiller, I decided to give it a go. This page reports my measurements comparing the simple ice bath to an immersion chiller.
Experimental Procedure

Reported here are three cooling tests with the chiller and three in an ice bath. Each consists of cooling an approximately 20 litre (∼5 US gal) batch of wort.
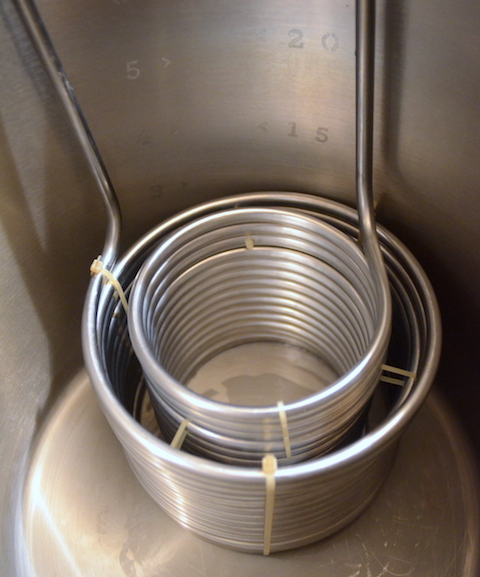
The chiller
Appalled at the idea of just running so much water down the drain I decided to use an ice bath as the water source and a pump to circulate the cold water through the chiller. In fact this is not purely a question of water economy. The amount of water concerned would completely flood our tiny California garden and there simply is not any sewer drain. (As it almost never rains there is no need for gutters, down-pipes and drains.) I do also note that though this method saves water, it consumes power in making the ice so the overall impact of this process compared to using tap water is not entirely obvious to me. The pump is possibly less powerful than would be ideal. I get about 4.5 l/min (1.2 USgal/min).
For the three chiller tests:
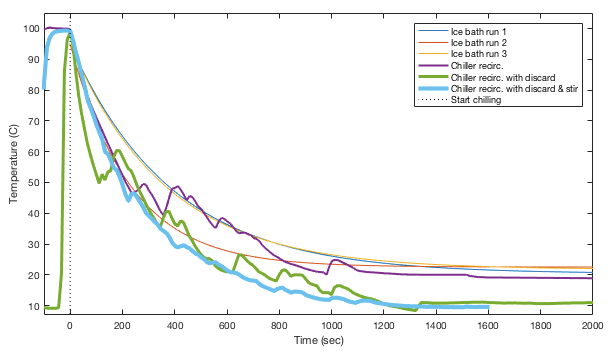
- Run 1, the ice water was pumped through the chiller and back to the ice bath. The chiller was agitated occasionally to stir the wort.
- Run 2, the first few gallons of very hot water were run off into a second bucket. Only after a couple of minutes once the water was coming through tepid was it returned to the ice bath, thus making the ice last a lot longer and providing a 'free' bucket of very hot water for washing and cleaning at the end. The chiller was agitated occasionally to stir the wort.
- Run 3, the same as run 2, discarding the very hottest water, but the chiller was agitated continuously so there were no hot and cold spots in the wort.
The ice bath
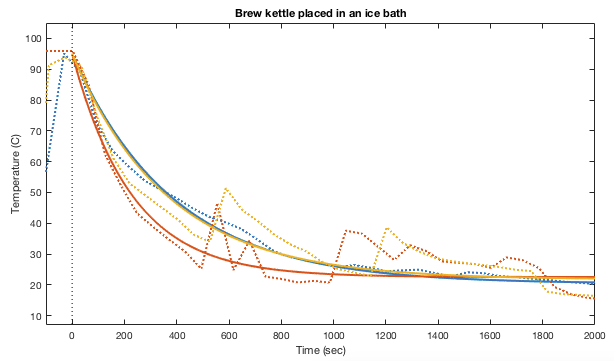
The comparison ice bath data are derived from simply sitting the brew kettle in an ice water bath and occasionally stirring or rocking the kettle. All the ice bath tests were performed in Colorado where the ice comes for free by simply shovelling snow from the garden.
It can also be seen in the plots that the boiling point for the ice bath tests was only about 95°C due to the altitude. In California we are at sea level so for the immersion chiller data the plots do start from 100°C.


Comments
Thoughts on speed of cooling
- The immersion chiller is probably a bit quicker than the ice bath, but not dramatically in terms of rate of cooling.
- Separating off the very hot first flow and not returning it to the ice is a huge improvement, primarily leading to a lower final temperature. Rather then dramatically faster cooling it allows sustained cooling to carry on much longer.
- Using the chiller and returning the hot water to the ice bath seems to offer little advantage over a simple ice bath either in terms of cooling rate or final temperature. This is reasonable. In either case you end up with all the heat transfered to the ice bath.
- To get to 50°C, the ice bath took 3.7–6min and the chiller took 3.6–4.9min which is little different.
- Considering only the two runs with discard of the hot water, the difference is much more impressive in time to get to 25°C. The ice bath (and chiller without discard) took 13–18min and only ever got to a final temperature of 20°C. The immersion chiller reached 25°C in 8–8.7min and a final temperature in the lager fermentation range in about 20min.
- At 10min, the ice bath and chiller-without-discard give a temperature in the range 28–36°C (82–100°F). The two chiller-with-discard runs were already getting close to ale fermentation temperatures, in the range 20–22°C (68–72°F).
Thoughts on stirring
- Continuous stiring has little overall impact. It makes the curve smoother and the cooling more homogeneous but no quicker overall than just a quick stir every couple of minutes.
- If your reason for chilling fast is the theory that it increases cold break formation then possibly you are better to not stir. By not stiring you cool a smaller volume much more rapidly, redistribute the heat with a quick stir and then cool another sample. Maybe the homogeneous, slower cooling of the stired wort is counter productive?
- Similarly, if rapid cooling is the objective then potentially a plate chiller is preferable since that cools a very small volume almost instantly. Even if it takes just as long to process the full volume, each part of the wort could be chilled vastly quicker than would ever be possible with a full volume immersion chiller.
Conclusions
It is nice to have and I expect to continue using the immersion chiller. I especially like the fact it produces my hot washing-up water for me outdoors without having to fire up the gas burner again. However in terms of rapidly cooling the wort I do not see much improvement over a simple ice bath. Of course if you do not like that conclusion there are many other variables that can be played with to get a different answer. Your own individual circumstances will have a considerable impact. For example your process is likely to be very different if living in an apartment vs. a house with a large garden or for those who live in a desert vs. among snow-clad peaks.
- Higher pump flow rates should help at least some.
- Copper chillers are common, though I am not yet convinced that the thermal conductivity of the metal itself is the limiting factor in the rate at which heat is transfered to the water.
- You could add salt to the ice bath, but that is then less useful for washing-up and watering the garden afterwards. Add ammonium nitrate, ammonium sulphate, magnesium sulphate or similar to the ice bath to lower the temperature and use the resulting water to fertilize the lawn?
- I am thinking about expanding the chiller coils with spacers to slightly increase the effective surface area and significantly increase the volume of wort being directly affected.
- Liquid nitrogen...
2020-07-12 4:43 PM
If you have comments or suggestions feel free to contact me: